Web Service, Implementing a
The blog is migrated to https://thiloshon.wordpress.com
Web Services are the most important elements of service oriented communication over the Internet. Knowing the underlying concepts of web services and how it has evolved over the time is very much expected from programmers. We might know pure Java or any other languages top to bottom but if we don’t know how its implemented in an industry or enterprise scenario there is not much use in what we learned. In the previous blog I covered many concepts and theories behind web services. In this blog let’s build a simple calculator web service in Java using GlassFish as application server and SOAP as the protocol. Let’s dive in.
Web Services are the most important elements of service oriented communication over the Internet. Knowing the underlying concepts of web services and how it has evolved over the time is very much expected from programmers. We might know pure Java or any other languages top to bottom but if we don’t know how its implemented in an industry or enterprise scenario there is not much use in what we learned. In the previous blog I covered many concepts and theories behind web services. In this blog let’s build a simple calculator web service in Java using GlassFish as application server and SOAP as the protocol. Let’s dive in.
Building a web service
I am using Netbeans in this blog since its very convenient to configure GlassFish server. IntelliJ IDEA can be used too but integrating server is a bit tedious.
In the Netbeans create a new project. Select ‘Java Web’ as Category and ‘Web Application’ as Project. Click ‘Next’

Name the project as ‘CalculatorWebService’. Click ‘Next’

Select Server as the ‘GlassFish Server 4.1.1’ or any other version of GlassFish. Click ‘Next’

(If you don’t see any servers listed in dropdown, click ‘Add’ and select the GlassFish Server. Click Next. And then click ‘Download’. This will download the Glassfish Server setup and install it in the directory specified.)

Leave the Framework tab as it is, we are not going to use any frameworks. Click ‘Finish’
Now our project will be opened and you can check the files in the ‘Project’ pane of Netbeans.
Now we have a Web Service project. We need to add a web service to the project. Let’s add the Web Service in a package. Right click on the ‘Source Package’ and click ‘New’. Select ‘Java Package…’.

Name it as ‘CalculatorWS’

Now let’s add the Web Service. Right click on the ‘Source Package’ and click ‘New’. Select the ‘Web Service…’. Name the Service as ‘Calculator’ and select the ‘CalculatorWS’ package from package dropdown list. Click Finish.

Now Calculator.java web service file will be opened. If it’s not, click the little ‘+’ in the ‘CalculatorWS’ package and double click the java file. Let’s check the content of this file.
The class is initialized with the annotation @WebService.
@WebService(serviceName = "Calculator")
public class Calculator {
This tells the compiler this class is a WebService class with the name ‘Calculator’.
The IDE populates the class with a sample HelloWorld Web Method.
/**
* This is a sample web service operation
*/
@WebMethod(operationName = "hello")
public String hello(@WebParam(name = "name") String txt) {
return "Hello " + txt + " !";
}
Web methods are annotated with @WebMethod Keyword. Like in class, here the annotation lets compiler know it’s a web service method with name ‘hello’. Inside the method notice the parameters are also annotated with @WebParam. Name of the parameter is ‘name’ and it is of type String.
We don’t need this method but let’s keep it as it is.
Let’s add a new method for adding numbers. Click the ‘Design’ tab of top toolbar.

This will take you to the GUI for managing the services of that web service.

Click ‘Add Operation…’ on the top left of the Operations pane.
Name the operation as ‘addNumbers’ type ‘int’ in return type. Click ‘Add’ in the Parameters Tab. Name it as ‘number1’ and change type to int. Click ‘Okay’. Once again click ‘Add’ and name the second parameter as ‘number2’ and set type as int. Click ‘Okay’. It should look like this now.

Click ‘Okay’ once again. The window will be closed and now you can see your new method listed in the ‘Operations’ pane.

Click the ‘Output’ tab of the new method, you will see return type specified as int. Now click the ‘Source’ tab in top and switch back to the source code. You will see code for your new method being auto generated under ‘hello’ method.

You can write this code and create the method too. You don’t necessarily have to do it in the GUI. I choose GUI since it is easier than coding. But GUI only created method signatures and return statements. The body needs to be coded by us.
Change the return statement of the new method
from return 0; to return number1 + number2;
This will return the added value to the caller.
That’s it. You have your web service!
Deploying the web service
We have programmed the web service. Now we have to deploy it so that I can be accessed by clients. Right click the root of the project ‘CalculatorWebService’ and choose ‘Clean and build’.

It will be finished within seconds. Now right click it again and choose ‘Deploy’. It will also be finished faster.
Now you have a Web Service up and running!
Let’s see how we can test our web service. Go to your browser and type http://localhost:4848/common/index.jsf in the URL. This will take you to the GlassFish Console where you can manage your web services. The console will look like this.

Click the ‘Applications’ link in the left options list. You will see your web service ‘CalculatorWebService’ listed there. Click it. In the ‘Modules and Components’ section click ‘View Endpoint’. This takes you to the ‘Web Service Endpoint Information’. You will see three links there.

Click the ‘Tester’ link and a new tab will be opened. In this ‘Web Service Test Links’ page click the first link. This takes you to a page where you can test your web service. You will see your method ‘addNumbers’ listed there along with the auto generated ‘hello’ method.

Type 2 numbers in the text boxes and click ‘addNumbers’

It will return the addition of numbers under ‘Method returned’.

Hurrah! You have a web service and it has returned your request.
Mapping the Theory
Alright, you have built a web service and even deployed it. But nowhere in the process we came across the concepts of SOAP or WSDL! (Not sure what these words are? Check my previous blog). So where are these implemented? Let’s map the theory in our implementation.
First remember I told in the previous blog, we will never have to deal with these when building a web service. It’s all implemented by the GlassFish server and IDE. So underneath these are implemented. Check the last page you came to in the browser. The ‘addNumbers Method invocation’ page.
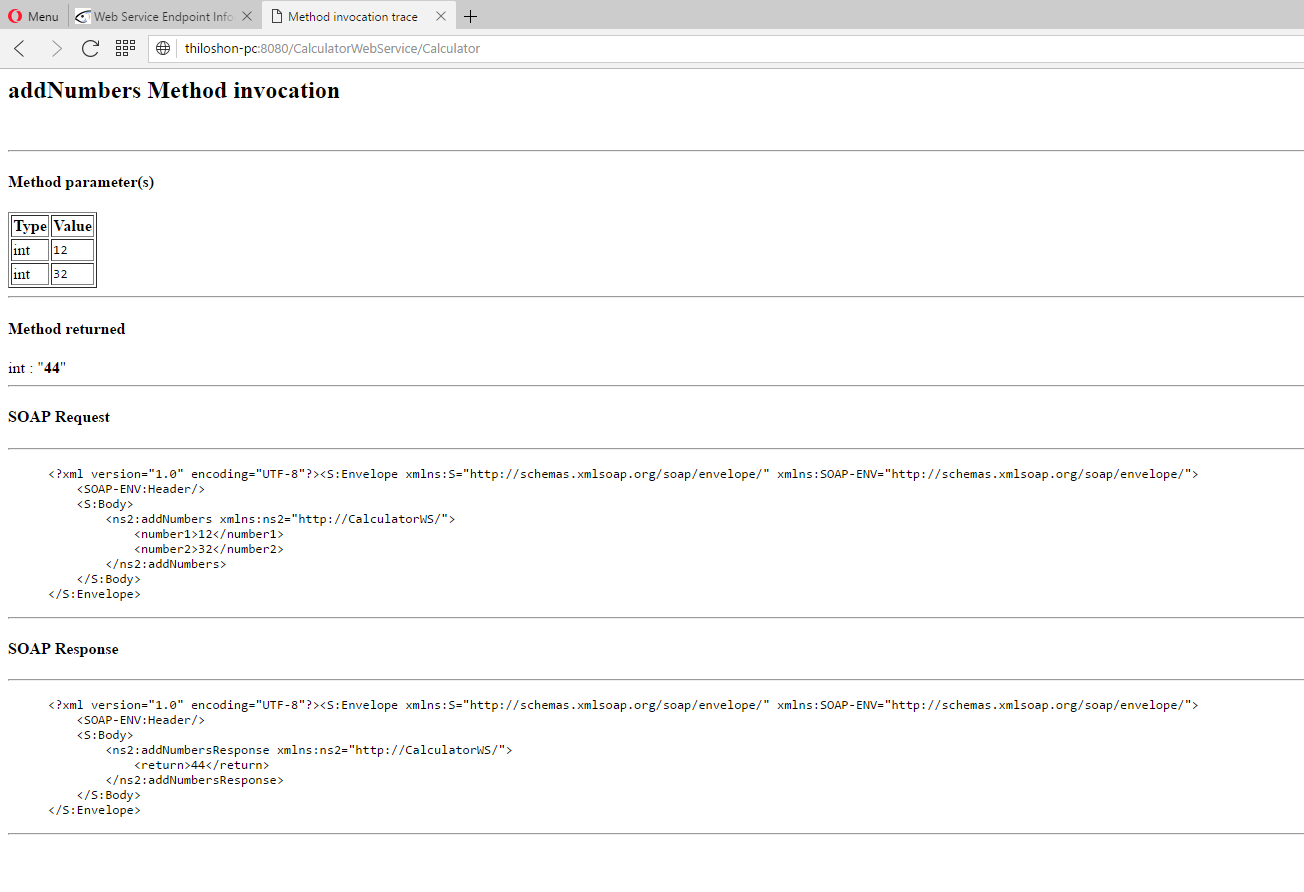
Here you will see the SOAP request and response of your last addNumbers method call. You will notice your parameters being covered in tags and returned value being tagged in return tags. So when you clicked the ‘addNumbers’ button in the previous page, the request was changed to a SOAP message and sent to the web service. The service responded with another SOAP message. That is how SOAP is used in your web service.
Okay, what about WSDL? Where is that? Now, go back to the ‘Web Service Endpoint Information’ page. You will see three links. Earlier you clicked ‘Tester’. Now click the ‘WSDL’ link. And once again click the first link. You will be taken to your WSDL file.

It’s a long, uninteresting file but if you look closely, you will notice things like,
<message name="addNumbers">
<message name="addNumbersResponse">
<message name="hello">
<message name="helloResponse">
<portType name="Calculator">
<operation name="addNumbers">
This is the WSDL of your web service, the description of your web service.


Building a client
Okay, now we have a web service. How does another machine communicate with the web service in order to get a service? We need a client application for that. So let’s make a CLI client.
Go to NetBeans and create a new project. Choose ‘Java’ under ‘Category’ and ‘Java Application’ under ‘Projects’. Name the project as ‘CLIClient’ and leave the ‘Create main class’ ticked for ‘cliclient.CLIClient’. Click ‘Finish’
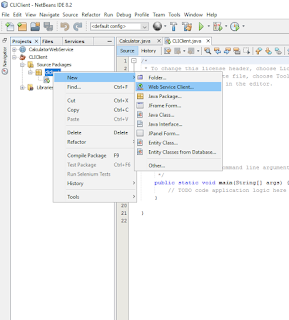
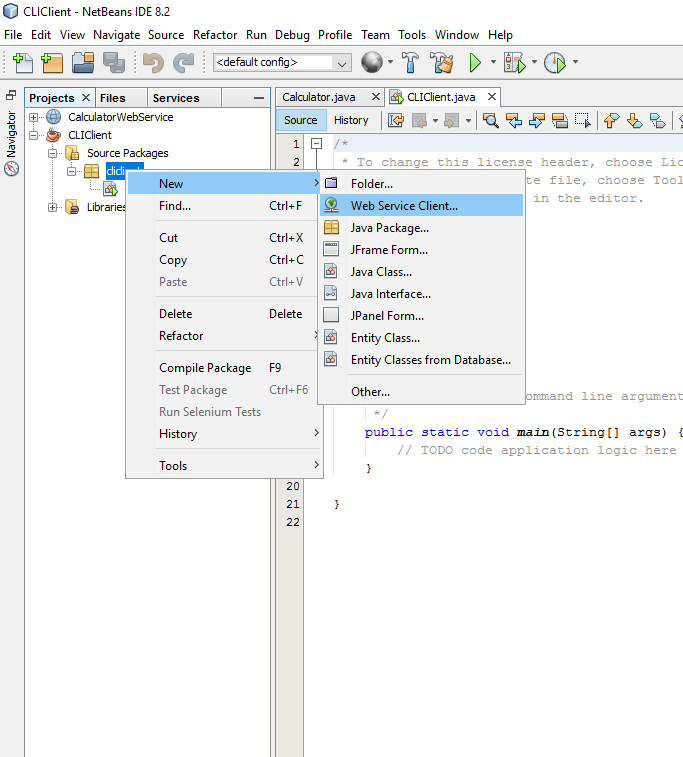
Now you will be taken to the CLIClient.java file. Just like earlier what you have made now is a client project. Not a client application. To create a client application right click on ‘cliclient’ package and select ‘New’ -> ‘Web Service Client…’.
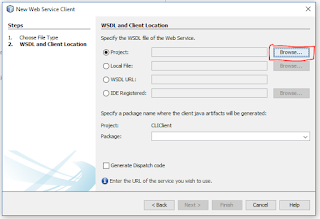
A ‘New Web Service Client’ wizard will be opened. You can create a client from a number of options. If the Web Service project your client is made for is in the same machine, you can select that. Or else if the web service is in a remote machine, then you can create the client from WSDL URL. Or else you can choose a local wsdl file. In our case we have the web service project in the same machine. So let’s select that. Click the ‘Project’ radio button and click ‘Browse’.
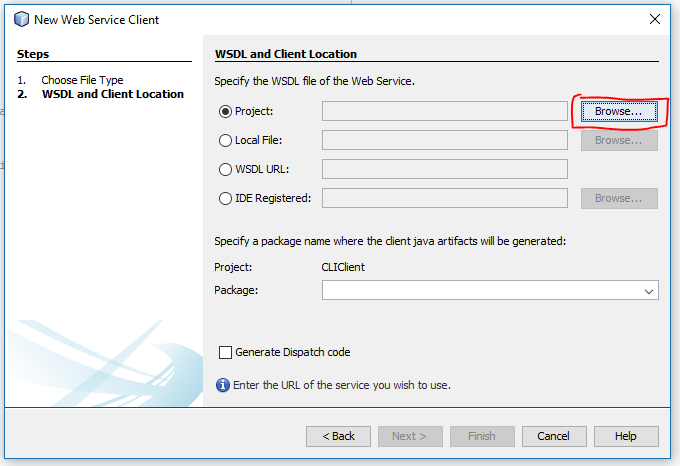
Select ‘Calculator’ under ‘CalculatorWebService’. Click ‘OK’.

You will see the URL of your web service WSDL filled in the text box. All web services are referred through URLs even if it’s in the same machine. Now click ‘Finish’.
Now you have created a client and linked it with the web service. Let’s program the client now.
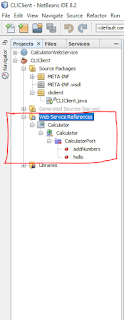
In the ‘Project’ pane of NetBeans you will find a folder called ‘Web Service References’. If you keep on opening it, at the end you will find a folder named ‘Calculator Port’ and services offered by the Web Service you linked listed there.

Keep your CLIClient.java file opened. Click on the ‘addNumbers’ service, drag it to the CLIClient.java file and drop it below main method. This will create the addNumbers method in your file.

Now call this method and print the result to the screen. Add the following lines to the main method.
System.out.println("Adding numbers 12 and 21: " + addNumbers(12,21));
Now run the java file. You will see the result getting printed in the console.

Congratulations! You have a client application which performs a web service.
Creating a GUI Client
Alright, we have a web service and a CLI client. But most of the enterprise implementations will require a GUI to make the usage easier. So let’s create a GUI client. We can use the same CLIClient project but to keep things cleaner, let’s make the GUI in a new package. The initial processes are similar to last part, so I’ll cover it faster.
Create a new ‘Java Application’ project and name it ‘GUIClient’. Leave ‘guiclient.GUIClient’ ticked. A GUIClient.java file will be opened. Right click on GUIClient project and create a new ‘Web Service Client’. Select the ‘Calculator’ web service under ‘Calculator Web Service’ in the ‘Project’ option. If you get a ‘WSDL file not available (server not running)’ warning, deploy the calculator web service and try again.
Select the ‘guiclient’ package under ‘Package’ dropdown. As before expand all files under ‘Web Service References’ in the ‘Project’ pane until you see the ‘addNumbers’ and ‘hello’ web services listed. Keep the GUIClient.java file opened. Drag the ‘addnumbers’ service and drop under the main method.
This will create the ‘addNumbers’ method in your file. Up to this all you did was exactly similar to the CLI. Now change the private access specifier of the addNumber method to public. At the end the file will look like this.

Now create a new package under ‘Source Packages’ of GUIClient. Name it as ‘GUIApplication‘. This is just to keep the GUI files separately from logic files.
Right click the GUIApplication and create a ‘JFrame Form…’.

Name it as ‘App’. This will create a Jframe and the file will be opened with the design view. If it opened with the code view, toggle the view in the top bar. In the left you will see the Palette for designing.

Drag the Label and Text Field elements from the palette and drop in the JFrame. Create the following GUI.

To change the text of the Labels, click on the element and change the text in the property window.

Likewise change all the texts of the elements as follows.

Once you remove the text of the Text Fields it will be shrunk. So adjust the size to a suitable size.
Now click on the ‘Add’ button, go to the ‘Events’ tab in the right pane and click the ‘actionPerformed’ drop down.

Click the ‘jButton1ActionPerformed’ option. This will take you to the code view of the same file and create a method for that action event.

We have to code the body of this method. Before that, add an import statement in the top of the App.java file.
import guiclient.GUIClient;
The reason is, our client methods are in the GUIClient.java file. In order to access those methods which are in a different package, we need to import that file.
Now let’s complete the body of the ‘jButton1ActionPerformed’ method. Add the following lines.
int number1 = Integer.parseInt(jTextField1.getText());
int number2 = Integer.parseInt(jTextField2.getText());
GUIClient.addNumbers(number1, number2);
jTextField3.setText(answer + "");
We are reading the values of the text boxes, passing the values as parameters to our web service, get the response and set is as the text of the answer textbox. The final file will look like this.

Now run the ‘App.Java’ file. Make sure you have the web service deployed before.
Your application will pop up. Type two number in the text boxes and click the ‘Add’ button. The answer will be displayed in the answer text box.

That’s it! You have a GUI Application which provides a service from the web service you created! In order to create a complex application, make several JFrames and call the web methods after importing it from the guiclient package.
Passing objects through web services.
This section is still under construction...

Great approach towards the concept of Web services. Now web services are simplified. Thanks for the tutorial man,
ReplyDeleteGood read!
ReplyDelete